Chapter 2. Installing the Volution Manager Server
- Table of Contents
- Go here for info on the current status of SCO Linux products
- 2.1. Hardware Requirements
- 2.2. Software Requirements
- 2.3. Formatting Installation Entries
- 2.4. Installing the VM Server
- 2.5. Verifying the VM Server Installation
- 2.6. Troubleshooting the VM Server
- 2.7. Installing Additional VM Servers
This section tells you how to install the Caldera Volution Manager Server (VM Server) and its components. The following information is included:
Hardware Requirements Section 2.1
Software Requirements Section 2.2
Formatting Entries Section 2.3
Installing the VM Server Section 2.4
Verifying the VM Server Installation Section 2.5
Troubleshooting the Installation Section 2.6
Installing Additional VM Servers Section 2.7
2.1. Hardware Requirements
LDAP Server
A Pentium® II or higher
A minimum of 40 MB of RAM
6 MB of free space on the hard drive
Note: The LDAP Server and VM Server can reside on the same computer unless you are using NDS eDirectory. NDS eDirectory must reside on a different server than the VM Server to accommodate differences in SLP implementation.
VM Server
A Pentium II or higher
A minimum of 64 MB of RAM, 128 MB recommended
OpenLinux requires a minimum of 1.3 GB for a full installation
4 MB of free space on the hard drive
2.2. Software Requirements
LDAP Server
OpenLDAP (installed with OpenLinux)
NDS eDirectory (included in the Volution Manager box)
iPlanet available from Sun Microsystems and Netscape
VM Server
OpenLinux 3.1.1 or higher (included in the Volution Manager box)
2.3. Formatting Installation Entries
During installation many of the entries require that you use LDAP naming properties. While defaults are provided for entries in the correct format, if you want to change the default settings, you need to use the LDAP naming properties and the correct format in your entry.
Table 2-1 lists common Volution Manager installation objects and their naming properties. While there are many more objects and container objects in a directory, the following are applicable to installing Volution Manager.
Table 2-1. Directory Objects
| Object | Naming Property | Usage |
|---|---|---|
| common name | cn | A cn refers to an object name. In Volution Manager, it can be used to refer to the directory or database administrator. |
| organizational unit | ou | An ou is a container. It organizes objects in the directory in a hierarchy. Organizational units are placed under organizations and can also contain other organizational units or objects. |
| organization | o | In Volution Manager, the organization object is the highest level in the directory structure. It contains organizational units and possibly other objects. |
When entering object names, use the formats listed in Table 2-2. Note that they are case sensitive.
Table 2-2. Entry Format
| Format | Explanation |
|---|---|
| cn=admin | common name for the administrator |
| , | comma delimiter |
| ou=computers | an organizational unit named computers |
| , | comma delimiter |
| yourcompany | an organization named your company |
Installation entries often require that you identify objects in relation to the directory heirarchy. Objects in the directory are uniquely identified by using their Fully Qualified Distinguished Name (FQDN). The FQDN includes an object's name combined with the container objects immediately superior to it. For example, cn=admin,ou=computers,o=caldera. See Section 1.1.1 for information on the directory heirarchy.
Important: Always use a comma delimiter between container names. While the NDS eDirectory uses the period (.) as the delimiter in its implementation of LDAP, Volution Manager requires that you use the comma delimiter for NDS.
2.4. Installing the VM Server
Instructions in this section detail how to install the VM Server, an OpenLinux server system running VM Server software. The VM Server includes the computer creation daemon (volutionccd) which adds VM Client computers to the directory structure, the DENS daemon (densd) which acts as an event scheduler, and the software repository daemon (volutionsrd) which adds distributable package objects to the software repository.
Note: If this is a new Volution Manager installation and you are using eDirectory or iPlanet as your LDAP directory, make sure that you complete the installation of these products, and have the appropriate access rights and information on where you want Volution Manager to create the objects it uses before you start the Volution Manager installation.
To initiate the graphical installation on OpenLinux, open a terminal window and complete the following:
Change to the auto/cdrom/server directory.
Enter install.sh
Enter the root password when prompted.
The next screen allows you to select the language for the Volution Manager interface.
Select the language you want for the VM Management Console and click OK.
The VM Management Console is a browser-based interface used to perform all management tasks.
Read the license agreement, and click Accept to continue.
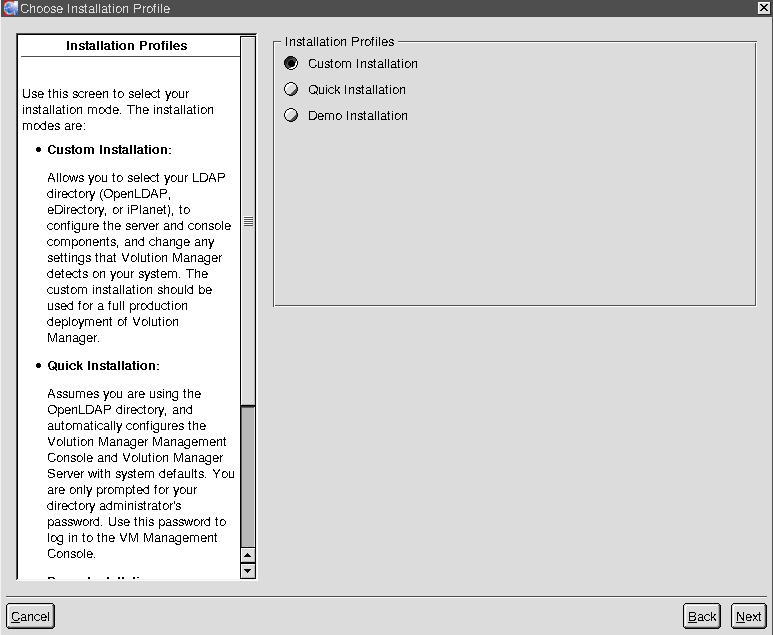
On the Choose Installation Profile screen, select the type of installation that fits your preference. See Table 2-3 for descriptions of the profile options.
Table 2-3. Installation Profiles
Profile Description Custom Installation Allows you to select your LDAP directory (OpenLDAP, eDirectory, or iPlanet), configure the VM Server, and change any settings that Volution Manager detects on your system. The Custom Installation option should be used for a full production deployment of Volution Manager. Quick Installation Assumes you are using the OpenLDAP directory, and automatically configures the VM Server with system defaults. You are only prompted for your directory administrator's password. Use this password to log in to the VM Management Console. For information on installing the VM Server using the Quick Installation profile, see Section 2.4.2. Demo Installation Provides you with an installation option for product evaluation, pilot project assessment, or technical review of the product. It is not intended for full production deployment. When you use this option, Volution Manager is configured with defaults and uses the password demo. For information on installing the VM Server using the Demo Installation profile, see Section 2.4.3. Note: The following steps assume that you select the Custom Installation. If you select Quick Installation, see Section 2.4.2. If you select the Demo Installation, see Section 2.4.3.
2.4.1. Selecting the Custom Installation
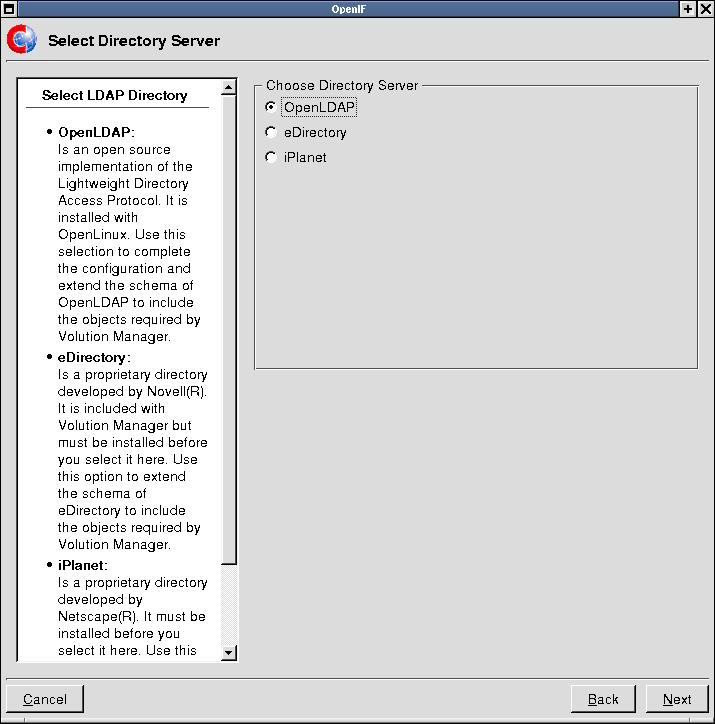
Select the LDAP directory that you want to use, then click Next. See Table 2-4 for details on LDAP options.
Table 2-4. Directory Selection Criteria
Directory Explanation OpenLDAP Installed with OpenLinux eServer. This selection completes the configuration and extends the schema of OpenLDAP to include the objects required by Volution Manager. eDirectory Novell NDS eDirectory is included with your distribution of Volution Manager. It must be installed and configured before you install Volution Manager. For installation requirements, see Section 1.1.1.5.2. iPlanet iPlanet is available from Sun Microsystems and Netscape. It must be installed and configured before you install Volution Manager. Note: Installation screens and required entries are the same regardless of your LDAP directory choice.
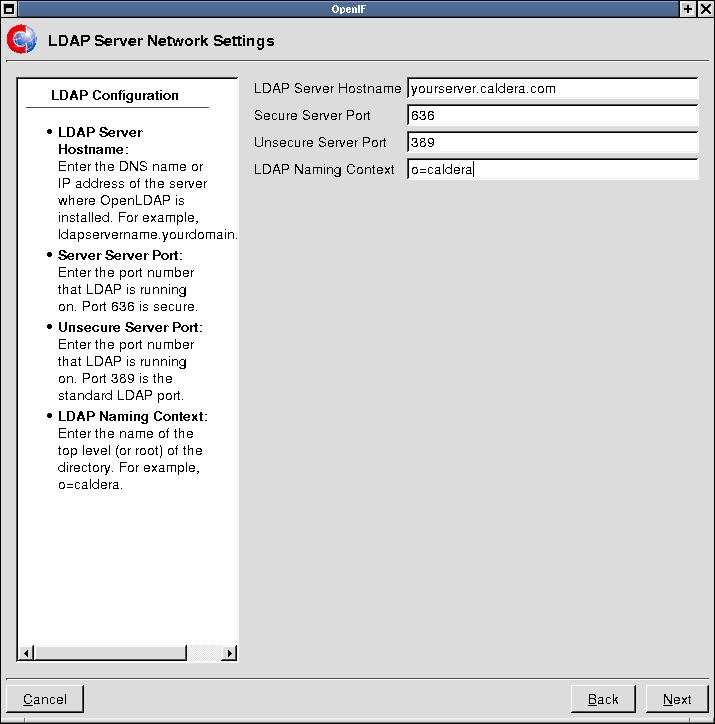
Configure your LDAP network settings. See Table 2-5 for details.
Table 2-5. LDAP Network Settings
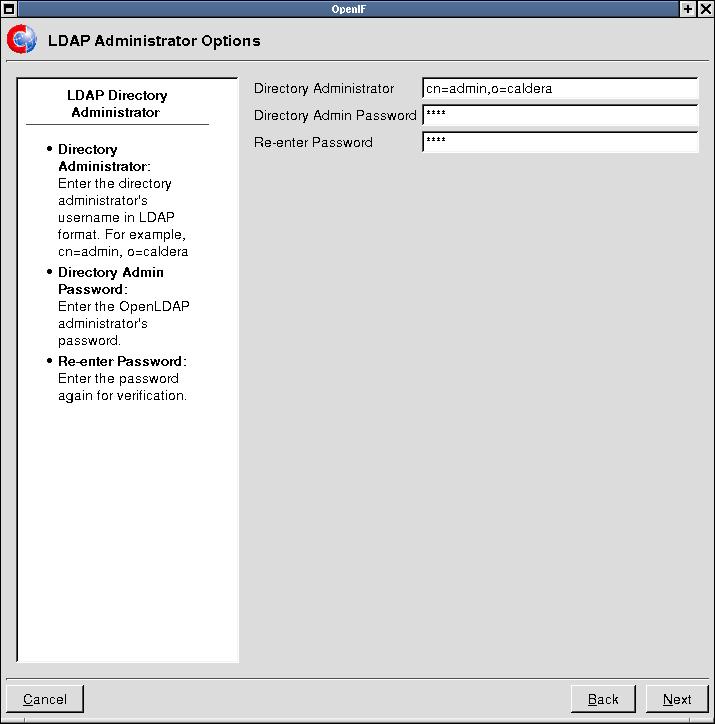
Setting Description LDAP Server Hostname Enter the DNS name or IP address of the server where LDAP is installed. For example, ldapservername.yourdomain.com Secure Server Port Enter the port number that LDAP is running on. Port 636 is secure. Unsecure Server Port Enter the port number that LDAP is running on. Port 389 is the standard LDAP port. LDAP Naming Context Enter the top level (or root) of the directory. For example, o=caldera. For information on using LDAP naming conventions, see Table 2-1. Enter the Directory Administrator's name and password information and click Next. See Table 2-6 for details.
Table 2-6. Administrator Options for LDAP
Setting Description Directory Administrator Enter the user name of the LDAP administrator. Use the LDAP entry format. For example, cn=admin,o=caldera. For information on using LDAP naming conventions, see, Table 2-1. Directory Administrator's Password Enter the administrator's password. Use this password to log in to the VM Management Console. You can use the default location for the directory administrator object in your LDAP directory or enter your own location using the LDAP naming conventions.
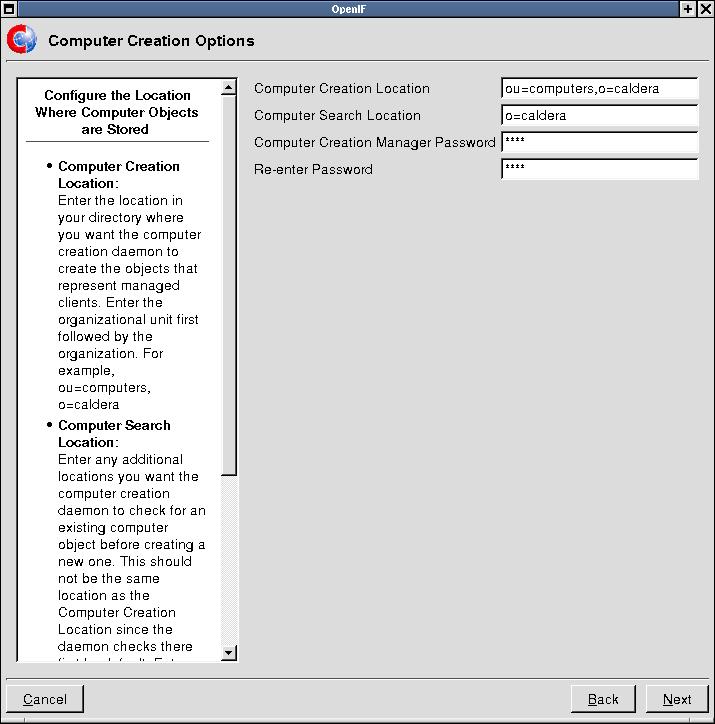
Enter the information to set up the location where you want your computer objects stored and click Next. See Table 2-7 for details.
Table 2-7. Options for Creating the Location where Computer Objects are stored
Option Description Computer Creation Location Enter the location in your LDAP directory where the computer creation daemon creates the objects that represent managed clients.
The job of the computer creation daemon is to detect and authenticate client systems as they come online. When a new client is detected, the daemon places an associated object in the directory structure.
Enter the organizational unit first, followed by the organization. For example, ou=computers,o=caldera.
Computer Search Location Enter additional locations you want the computer creation daemon to check for existing computer objects before creating a new one. This should not be the same location as the Computer Creation Location since the daemon checks there first by default. Enter the organizational unit first, followed by the organization. For example, ou=testlab,o=caldera. Computer Creation Manager Password Enter the password for the administrator with rights to this location. Specify your software repository configuration then click Next. See Table 2-8 for details.
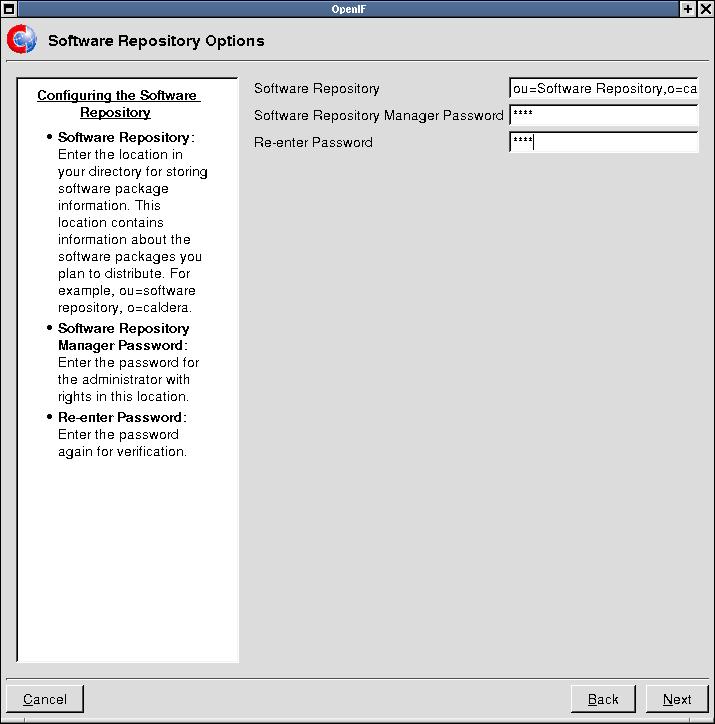
Table 2-8. Software Repository Configuration Options
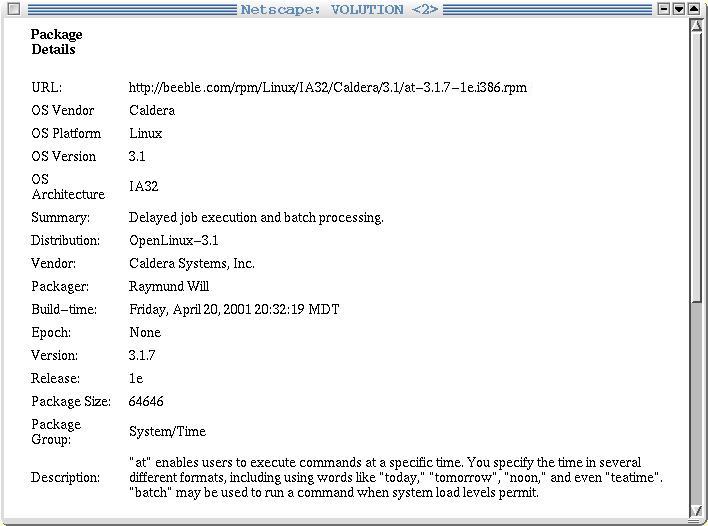
Option Description Software Repository An organizational unit in your LDAP directory that includes objects that represent software packages you plan to distribute. For supported versions of Linux, software packages are referred to as RPMs, SCO OpenServer packages are referred to as custom, and UnixWare® and Open UNIX® 8 packages are referred to as pkg. These objects provide information to the VM Clients on how to find these software packages on the network. Figure 2-7 shows the details for the RPM named "at" in the software repository. Enter the format for the software repository similar to the following: ou=Software Repository, o=caldera. Software Repository Manager Password Enter the password for the administrator with rights in this location. The following figure displays RPM details as they appear in the software repository.
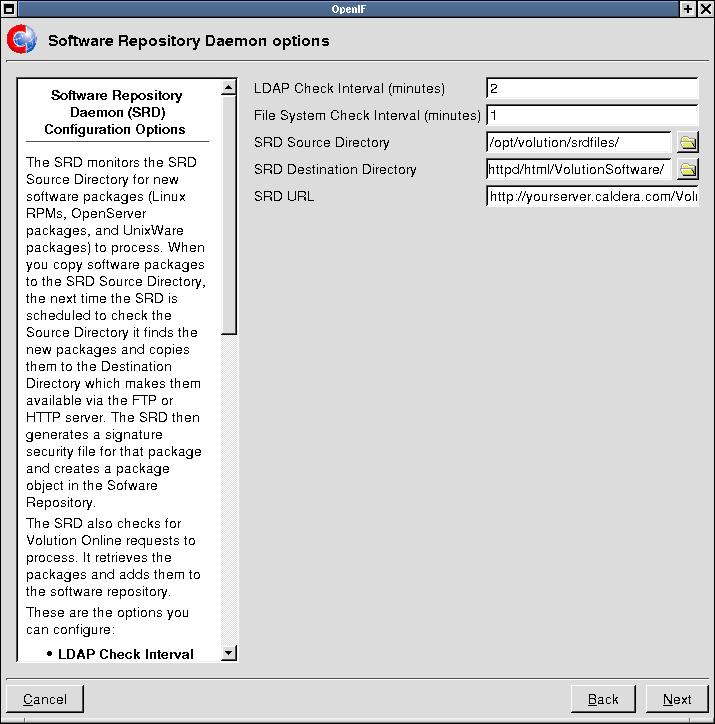
Configure the Software Repository Daemon (SRD) then click Next. See Table 2-9 for details.
The Software Repository Daemon, volutionsrd, monitors the SRD Source Directory for new software packages to process. When you copy software packages to the SRD Source Directory the next time the SRD is scheduled to check the Source Directory, volutionsrd checks for new packages and copies them to the Destination Directory, making them available via the HTTP (default) or FTP server. The SRD then generates a signature security file for that package (packagename.signature) and creates a package object in the Software Repository in the container named secure that contains the URL to the HTTP or FTP server where the file can be found. If the same object created in the container, secure also exists in the container pub, it will be deleted from pub.
Note: The FTP server on OpenLinux is not started by default. If you want to allow anonymous FTP access, you must start the server. For information on starting the FTP server, see the OpenLinux System Administration Guide.
The SRD also checks for Caldera Volution Online requests to process. Caldera Volution Online is Caldera's new Internet-delivered software management service. Caldera Volution Online manages Linux systems by providing alerts, information, and software updates to keep your VM Server and VM Client systems up-to-date, secure, and reliable.Volution Manager provides integration with Caldera Volution Online through the Volution Manager Management Console (VM Management Console).
The SRD retrieves the packages from Caldera Volution Online and adds them to the software repository.
Table 2-9. Software Repository Daemon Configuration Options
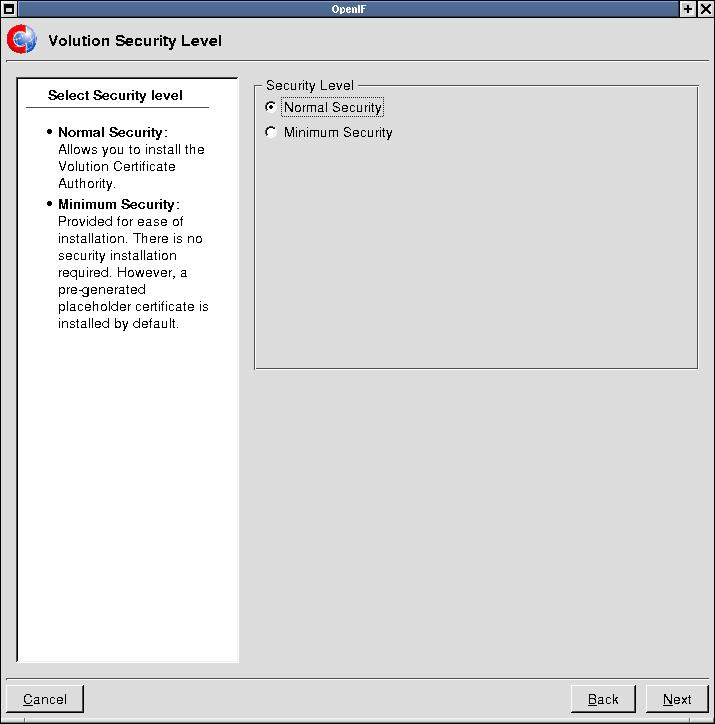
Option Description LDAP Check Interval (minutes) Establishes the frequency that you want the SRD to look in the LDAP directory for packages that have been requested through the Caldera Volution Online integration. Generating Caldera Volution Online requests is done through the VM Management Console. File System Check Interval Establishes how often you want the SRD to check the SRD Source Directory for any new package files. SRD Source Directory The location where the SRD looks for packages to process. Manually copy packages here that you want imported into the software repository by the SRD. SRD Destination Directory The directory where the SRD puts package files to distribute. This directory must correspond with the HTTP server URL specified in the SRD URL. SRD URL The URL for the HTTP server on your OpenLinux server. Volution Manager provides X.509 certificate-based security. Select your security level and click Next. See Table 2-10 for details.
If you selected Normal, continue with the next step. If you selected Minimum, skip to the end of the installation instructions.
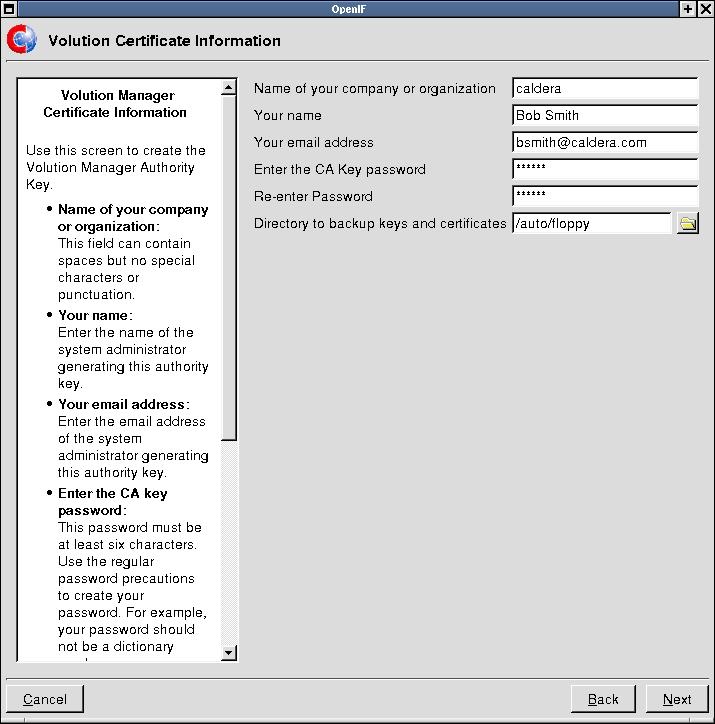
Complete the fields on the Volution Certificate Information screen, then click Next. See Table 2-11 for details.
Table 2-10. Security Level
Level Description Normal Creates and installs the Volution Manager Certificate Authority (CA). A CA is an authority that issues and manages security credentials and keys for message encryption. As a part of the public key infrastructure (PKI), a CA checks to verify information provided by the requester of a digital certificate. If the request is verified, the CA can then issue a certificate. Minimum Provided for ease of installation. There is no security installation required with this selection. However, a pre-generated place-holder certificate is installed by default. Complete the fields on the Volution Certificate Information screen, then click Next. See Table 2-11 for details.
Table 2-11. Creating the Volution Manager Authority Key
Field Description Name of your company or organization Enter the name of your company or organization. Your name Enter the name of the system administrator generating this authority key. Your email address Enter the email address of the system administrator generating this authority key. Enter the CA Key password This password must be at least six characters. Use the regular password precautions to create your password. For example, your password should not be a dictionary word. Directory to backup keys and certificates Enter the location where you want to keep the Volution Manager Authority Key. To protect the key from exposure to computers on the network, the default backup location is a floppy. Important: The Volution Manager Authority Key on the VM Server includes a subject, issuer, and fingerprint. The VM Client CA Certificate also includes this information. As an extra measure of security you can cross check the information on the VM Server's Volution Authority Key with the VM Client CA Certificate when you install VM Clients. To do this, you must know what the information is on the VM Server Authority Key. If your VM Clients are remote you need to have this information written down for those installing VM Clients. To view this information on the VM Server, enter /opt/volution/bin/volutionkeytool cacert list. Keep this information available when you install your VM Clients.
For information on the Volution Manager Key Tool, see Section 3.3.1.3, Section 3.3.2.1, and Section 3.3.3.1.
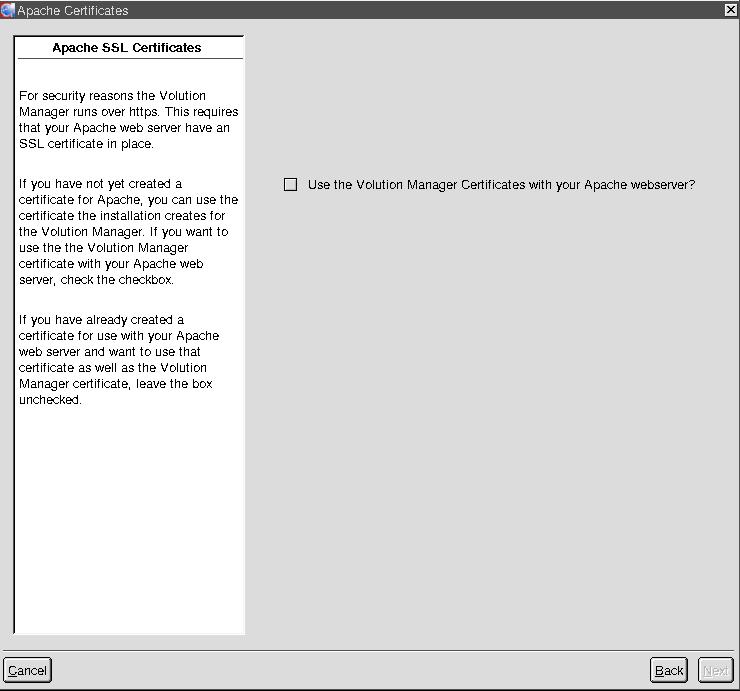
Volution Manager provides secure communication between your web browser and the Apache Web Server using an SSL certificate. If you already created a certificate for Apache, you don't need to create another one. If you want to use the certificate that the Volution Manager creates during installation, you can make that selection now.
Check the checkbox to use the Volution Manager certificate created during installation for the Apache Web Server to use. If you would be prefer to have separate certificates, leave the box unchecked.
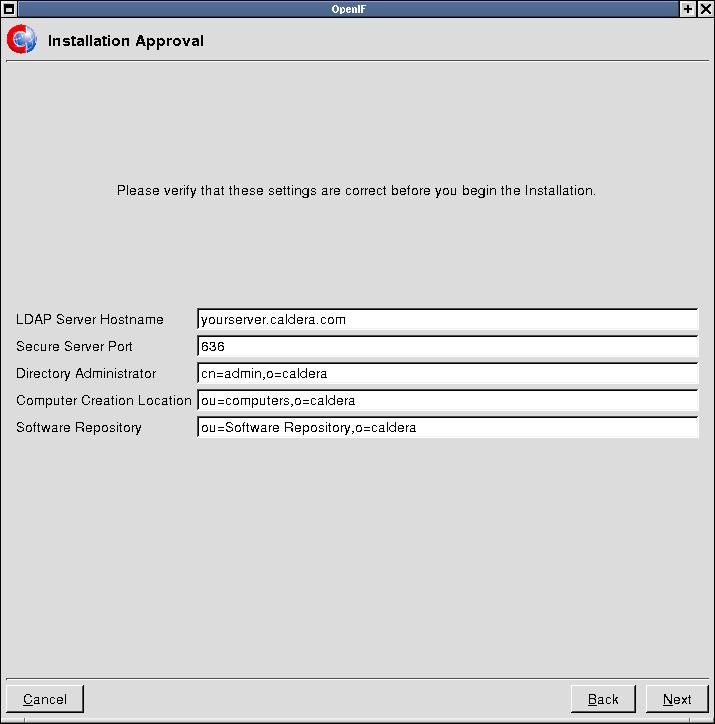
Verify that the information on the Installation Approval screen is correct and then click Next.
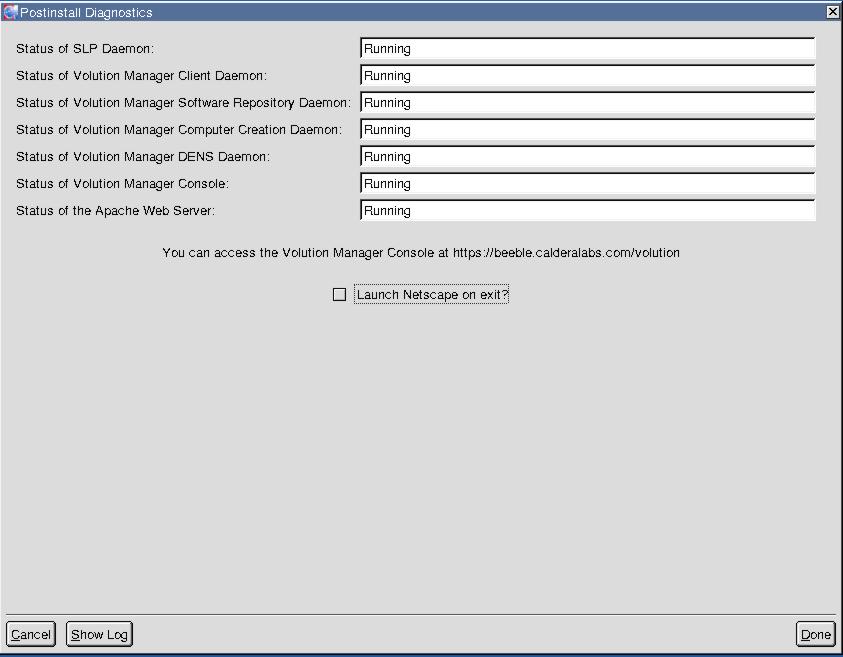
The Postinstall Diagnostics screen appears with the URL for your VM Management Console.
To verify that the VM Server is operational, open a web browser and enter:
https://yourserver.yourcompany.com/volution
Important: Make sure to enter https. The VM Management Console is a secure web site.
For information on using the VM Management Console, see the Volution Manager Administration Guide.
You are ready to install VM Clients. See Chapter 3 for instructions.
If the status field for any component indicates that it failed to start, refer to Section 2.6.
2.4.2. Selecting the Quick Installation
To initiate the installation, see Section 2.4.
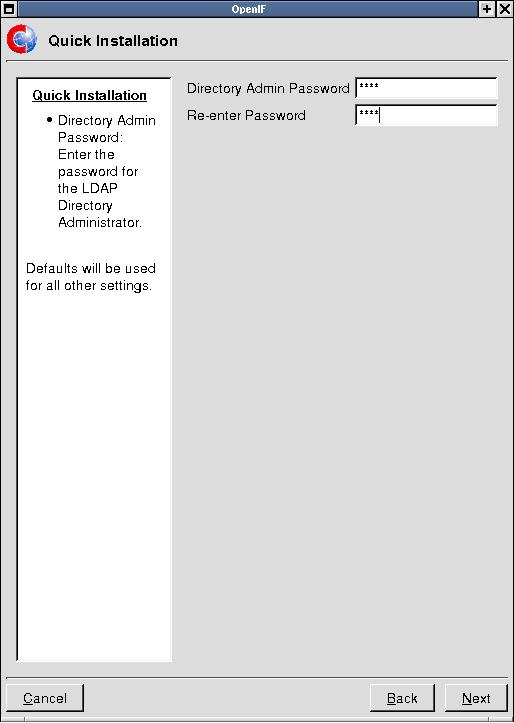
Select Quick Installation, and the following screen appears:
Enter the password for the OpenLDAP administrator. Use this password to log in to the VM Management Console. Defaults are used for all other settings. See Table 2-12 for defaults. The defaults are expressed using the example server hostname, yourserver.caldera.com.
Table 2-12. Quick Installation Defaults
Setting Default LDAP Server Hostname If Volution Manager is installed on an OpenLinux system named yourserver.caldera.com, the LDAP Server Hostname is also yourserver.caldera.com.
See Table 2-5 for details.
LDAP Naming Context or top level of the directory tree. The top level or root of your LDAP directory is the domain name portion of the hostname or o=caldera. See Table 2-5 for details. Computer Creation Location Using the example LDAP server hostname, yourserver.caldera.com, the computer creation location is ou=computers,o=caldera.
See Table 2-5 for details.
The LDAP Check Interval 2 minutes.
See Table 2-9 for details.
File Check Interval 1 minute.
See Table 2-9 for details.
SRD Source Directory /opt/volution/srdfiles/
See Table 2-9 for details.
SRD Destination Directory /home/httpd/html/VolutionSoftware/
See Table 2-9 for details.
SRD URL http://yourserver.caldera.com/VolutionSoftware/
See Table 2-9 for details.
Security Minimum
See Table 2-10 for details.
Verify that the information on the Installation Approval screen is correct, then click Next.
The Postinstall Diagnostics screen appears with the URL for your VM Management Console.
To verify that the VM Server is operational, open a web browser and enter:
https://yourserver.yourcompany.com/volution
Important: Make sure to enter https. The VM Management Console is a secure web site.
For information on using the VM Management Console, see the Volution Manager Administration Guide.
Enter the OpenLDAP administrator's password to log in to the VM Management Console.
You are ready to install VM Clients. See Chapter 3 for instructions.
If the status field for any component indicates that it failed to start, refer to Section 2.6.
2.4.3. Selecting the Demo Installation
To initiate the installation, see Section 2.4.
Select Demo Installation and the Volution Manager Installation screen appears.
Click Next. Defaults are used for all settings. See Table 2-13 for defaults. The defaults are expressed using the example server hostname, yourserver.caldera.com.
The Postinstall Diagnostics screen appears.
The Postinstall Diagnostics screen appears with the URL for your VM Management Console.
To verify that the VM Server is operational, open a web browser and enter:
https://yourserver.yourcompany.com/volution
Important: Make sure to enter https. The VM Management Console is a secure web site.
Enter demo to log in to the VM Management Console.
For information on using the VM Management Console, see the Volution Manager Administration Guide.
You are ready to install VM Clients. See Chapter 3 for instructions.
If the status field for any component indicates that it failed to start, refer to Section 2.6.
Table 2-13. Demo Installation Defaults
| Setting | Default |
|---|---|
| LDAP Server Hostname | If Volution Manager is installed on an OpenLinux system named yourserver.caldera.com, the LDAP Server Hostname is also yourserver.caldera.com. See Table 2-5 for details. |
| OpenLDAP Administrator Password | demo |
| LDAP Naming Context or top level of the directory tree. | The top level or root of your LDAP directory is the domain name portion of the host name or o=caldera. See Table 2-5 for details. |
| Computer Creation Location | Using the example LDAP server Hostname yourserver.caldera.com, the computer creation location is ou=computers,o=caldera. See Table 2-7 for details. |
| The LDAP Check Interval | 2 minutes. See Table 2-8 for details. |
| File Check Interval | 1 minute. See Table 2-8 for details. |
| SRD Source Directory | /opt/volution/srdfiles/ See Table 2-9 for details. |
| SRD Destination Directory | /home/httpd/html/VolutionSoftware/ See Table 2-9 for details. |
| SRD URL | http://yourserver.caldera.com/VolutionSoftware/ See Table 2-9 for details. |
| Security | Minimum See Table 2-10 for details. |
2.5. Verifying the VM Server Installation
To verify that the VM Server is operational, open a web browser and enter:
https://yourserver.yourcompany.com/volution
Note: Make sure to enter https. The VM Management Console is a secure web site.
Log in to the VM Management Console using the LDAP administrator's password for the custom and quick installation profiles, and demo for the demo installation profile. For information on using the VM Management Console, see the Volution Manager Administration Guide.
2.6. Troubleshooting the VM Server
The Postinstall Diagnostics screen appears at the end of the installation process.
The Postinstall Diagnostic screen reports the status of the Volution Manager daemons and the VM Management Console. If a service did not start up correctly, the diagnostic screen reports it as "Failed to Start." Otherwise, the service is listed as "Running." If a daemon or the console failed to start, use the following information to troubleshoot:
If you are using a Linux platform other than OpenLinux 3.1.1, the VM Management Console won't start. Install the OpenLinux 3.1.1 CD available with Volution Manager.
If Tomcat is not running on OpenLinux, the VM Management Console won't start. Use Webmin to start Tomcat. To access Webmin, go to the OpenLinux KMenu and click Webmin. Login as root using the root password. From the main Webmin screen click System and then Bootup and Shutdown. Look for Tomcat in the Action list and restart if necessary.
If you entered the incorrect Directory Administrator's password on the LDAP Administrator Options configuration screen the VM Management Console won't start. For more information on that screen, see Table 2-6.
If a daemon fails to start, restart it using the following command:
/etc/rc.d/init.d/daemonname restart
The following table lists Volution Manager daemons.
Table 2-14. Volution Manager Daemons
| Service | Daemon Name |
|---|---|
| SLP Daemon | slpd |
| Volution Manager Client Daemon | volutiond |
| Volution Manager Software Repository Daemon | volutionsrd |
| Volution Manager Computer Creation Daemon | volutionccd |
| Volution Manager DENS Daemon | densd |
2.6.1. Diagnosing Common Problems
Most of the errors that you might encounter when running Volution Manager fall into one of these categories:
The computers running the VM Server, VM Management Console, Directory Services, or VM Client software are down. Ensure that these systems are functioning and on the network before further troubleshooting.
The network is down. Test network connectivity between systems by running ping, telnet, or any other basic network command.
Network services are not running or are not configured correctly. You must ensure that TCP/IP networking, including SNMP and DNS, are correctly installed, configured, and running on your system. See your System Administration Guide for more information.
Services used by Volution Manager are not running. Volution Manager's key functionality is managed by daemons that run on the VM Server and VM Clients. Each daemon, such as densd or volutiond, can be manually started using the start command. For example, to start densd, enter:
/etc/rc.d/init.d/ densd start
The VM Server must be running volutionccd, densd, volutionsrd, and slpd. VM Client systems must be running volutiond.
These services may also be running, but not configured correctly. See the Volution Manager Administration Guide for more troubleshooting information.
For more information on troubleshooting, see the Volution Manager Administration Guide.
2.7. Installing Additional VM Servers
There might be situations where you need to install more than one VM Server on your network. For example, if different organizations inside your company control different sets of computers or if you want to install a test Volution Manager system, you would want to install additional VM Servers. If you install additional VM Servers on your network that you want to run independently, additional configuration is required. VM Clients also require additional configuration so that they can communicate with the correct VM Server.
For more than one VM Server to operate in your network, each server has to be configured with a separate SLP scope. The SLP scope allows you to logically partition your network. When a VM Server registers with SLP it registers with a particular scope. This scope is identified in /etc/slpconf as follows:
net.slp.useScope=scope_name
The useScope values in the VM Server and VM Client must match in order for the VM Clients to register with the correct VM Server. The format for the scope_name should include only alphanumeric characters. The scope allows your VM Server to advertise the services it provides to VM Clients within the same scope.
